
Ten Easy Science Experiments to Do at Home
Many years ago, for my little brother’s 9th birthday we put on a science party. Each of us had a different experiment to do with him and we had the recipes all ready and the ingredients laid out. We all took turns and we made this very rainy day one of the best birthdays that anyone has have ever had! We still talk about it quite often!
Over the last few months, a few of the kiddos that I nanny have expressed an interest in doing some science experiments- especially a very special now ten-year-old boy! This inspired me to find those recipes we had from so long ago, pull them out, and see how I could duplicate that day for these kiddos.
I made a list of the things we needed and with the help of my family, remembered all that I could from that day. Together, my family and I have been planning for the last month or so and let me just say- that shopping day was quite fun as I collected all the ingredients at the store. I also had fun finding a few things online to make the day more special.
It was a great surprise to the children and I am happy to share some of these recipes with you. I had fun creating party-ready printables and they are now available over on my Etsy account. This is to make it easier for you so you can set up your own science birthday party for your kids!
So here are all the things that we did and a few more ideas to make an exciting science party! And I will add – be prepared – the kids will get messy! But it is all a part of the fun! We just had a bucket of soapy water and some washcloths nearby for them to wash up whenever they needed to.
Bacteria Growth Science Experiment

This experiment is a super fun one! The kiddos got to make a simple recipe of jello from a Knox gelatin pack and apple juice. Then I had them pour it into these small petri dishes. After that, it was time for it to chill and see if it collected any ‘bacteria.’
At the end of the day, this turned into a surprise treat when I handed them their petri dishes and a spoon and told them to taste it. It had grown ‘bacteria’ which they figured out was sprinkles! They had a good laugh and said it tasted so good. I remember teasing my brother years ago when he grew gummy worms in his bacteria experiment! He loved it though!
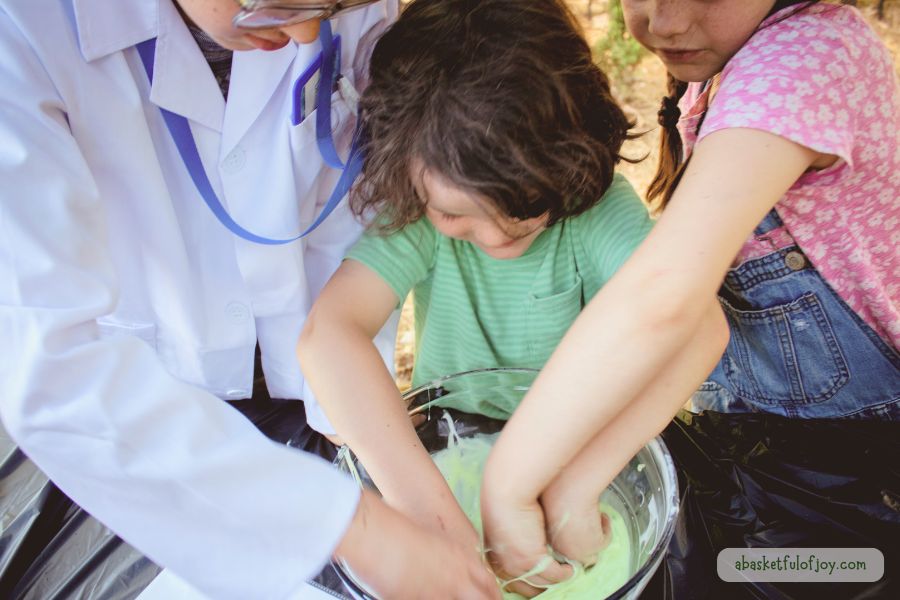
Slippery Slime – white glue

This recipe is so versatile with all the fun add-ins and the different choices of colorings. Our first we made with regular white liquid Elmers glue and liquid starch. The kids wanted to make it green and we added in some fun sequences making it look awesome! Without much hesitation, they had their hands in it and were getting all slimy! Next time I would give them their own bowl so they could mix it all up as much as they want.
Slippery Slime – clear glue

This one is the same recipe but we made it with clear glue and it turned out really cool! Purple was the chosen color and we remembered to add some glitter in as well. This one looked amazing and was instantly a favorite. The consistency changes with the amount of glue or starch you put in so make sure you check the recipe notes to see how to make it the best playful texture.
Cornstarch Crud

Hands down, this one was the favorite of all the fun slimy concoctions. The simple mix of cornstarch and water makes this one hold the interest of everyone! We had all the kids pound it and then slowly push their fingers in. The best part is when you pick up a chunk of it as fast as you can and then it instantly melts in your hand.
Everyone loved this and even my brother got into it again – remembering his birthday many years ago! Later the littlest ones played with this for a good long time and I think it would be a fun mixture to give them for sensory play outside.
Fantastic Flubber

This is another experiment using white glue and borax. It goes together instantly as soon as the borax is poured in and it becomes so bouncy. It doesn’t hold much color at all but it is so fun to knead with your hands. The kids loved this one and how it was so different than slime!
Lava Lamp

This experiment can get messy – so be prepared and have a funnel handy. This is a fun reaction showing the separation between oil and water. Use any coloring of choice, and some glitter if the kiddos want, to make the reaction so much cooler. Alka seltzer tablets make this reaction work the best, though you can also use salt. This is one of those experiments the kids have to sit back and watch as the tablet dissolves grabbing the oil and making it sink!
Mud Volcano

This is one of those fun classic experiments with baking soda and vinegar. My brother made a simple volcano out of mud – putting mud on a tray and building it up around a glass pint jar. We added red cake icing around the outside and put some in as well for the lava affect. Then when we were ready, we put a good amount of baking soda into the jar. It was really awesome as the vinegar was poured in and the reaction happened. The kids loved it and for more fun we added more baking soda and vinegar to watch the reaction again!
Tornado Tube

For such a cool simple toy, this one brings hours of entertainment. I loved watching the kiddos figure this one out and see how fascinating it is. It reminds me of when I was little and my siblings and I would get out the biggest glass we could and a long spoon. We’d fill the glass with water and then stir it so fast and watch the tornado!
Now they have this really cool attachment to add to two soda bottles. You fill one with water, attach the tool, and then flip it over. Then the child has to spin it in such a way to create a tornado effect. We all had to laugh when the kids would spin it the opposite way canceling out the tornado and causing the water to slow down. This one sure brought lots of smiles!
Mentos and Coke

This is a classic geyser experiment and is so much fun. You never know the size of the geyser you might get! It is best to get diet coke – though other sodas will work fine, this one has been shown to give the biggest reaction. There are all sorts of cool attachments to make this experiment work better, but honestly, all you need is the 2-liter bottle of coke and about 5-7 Mentos.
The kids should be back a good bit and an adult should be the one to put the Mentos into the coke. The faster you do it the better as the least amount of fizz should escape the bottle. Don’t forget to run as soon as you can after dropping the Mentos in! The fun is hearing the kids squeal as the coke shoots into the air!
Light Bulb refreshments

Not as much of an experiment, but definitely a fun treat to keep the kiddos hydrated. I bought these cool plastic light bulbs and test tubes which I plan to use later for other experiments, and filled them with apple juice and a small bit of mint-flavored chlorophyll I had on hand. The kids were a little hesitant drinking green juice, but after they tried it they loved it! With the added fun of silly straws, they were begging for more!
More party fun and tips

This party was fun to put on but also keep very simple. I set up a canopy shade tent in the backyard and we decorated with some cool balloons. A folding table and a cheap table cloth worked out great.
I surprised the birthday boy with a lab coat, id tag, and safety goggles. The other kiddos loved to get their sticker badges and goggles on as well. I let them use gloves when they wanted to, but mostly they had their hands in the slimes without the gloves!
Some of the best tools were these plastic beakers that we used to measure and pour water or glue into our glass bowl. And yes, I recommend getting a glass bowl better than metal or plastic. We just washed ours out after each experiment. I stored the slimes in these simple plastic cases for more fun later.
This party turned out to be a success and the kids were all smiling when it was over. They even remembered all the experiments and would tell me which ones were their favorites! I enjoyed making them smile and see the fun they were having. My family had so much fun as well as some of my siblings and my mom were able to help me. It was fun to think back on my brother’s birthday and now we got the fun of replicating it for other kiddos. We have plenty of other experiments to do, so who knows – we may do this again!
Let me know which experiments your kids liked best and also tell me what other ones you like to do! I’d love to hear as we are always looking for more fun ways to teach science to the kiddos!
Also don’t forget to check out my Etsy account to find all the recipes and fun printables over there – all made to bless you in your homeschool journey!
He is the divine portrait, the true likeness of the invisible God, and the firstborn heir of all creation.
For in him was created the universe of things, both in the heavenly realm and on the earth, all that is seen and all that is unseen.
Every seat of power, realm of government, principality, and authority—it all exists through him and for his purpose!
Colossians 1:15-16 TPT
Subscribe to my newsletter:
By submitting this form, you are consenting to receive marketing emails from: A Basketful of Joy. You can revoke your consent to receive emails at any time by using the SafeUnsubscribe® link, found at the bottom of every email. Emails are serviced by Constant Contact

